
The White-Label Architecture Guide
Part 1: Configuration as Code for React Native at Scale

White-labeling is taking one product and repackaging it under different brands: one codebase, many apps — each with its own name, icon, colors, and credentials. The end user of “Bean & Brew” and the end user of “Morning Roast” would never know they’re running the same coffee ordering app underneath.
The concept isn’t new. Native mobile development has had this built in for years. iOS calls them Targets — you create a new target in Xcode, point it at different assets, and a different Info.plist, and you get a separate app. Android has a more layered system: build variants. A build variant is the combination of a build type (debug, release) and a product flavor (your brand). You define product flavors in your build.gradle — each with its own applicationId, resources, and build config fields — and Android generates a variant for every combination. Different configurations, code, and resources — all managed from one codebase.
On my core, I’m an Android developer, so the terms “flavor” and “variant” stuck with me. Even now, working cross-platform with React Native, I still call each branded variant a flavor. I’m not sure why, but that is how we have been calling all the different branded apps.
I’ve been working on this particular problem for the last 4–5 years. What started as a handful of branded apps has grown to over 400 flavors — all built, shipped, and maintained from a single codebase. Along the way, I’ve had to solve problems that no tutorial covers: dynamic CI pipelines that build hundreds of apps in parallel, OTA updates that reach the right users across the right flavors, and automated credential management for hundreds of Apple and Google accounts.
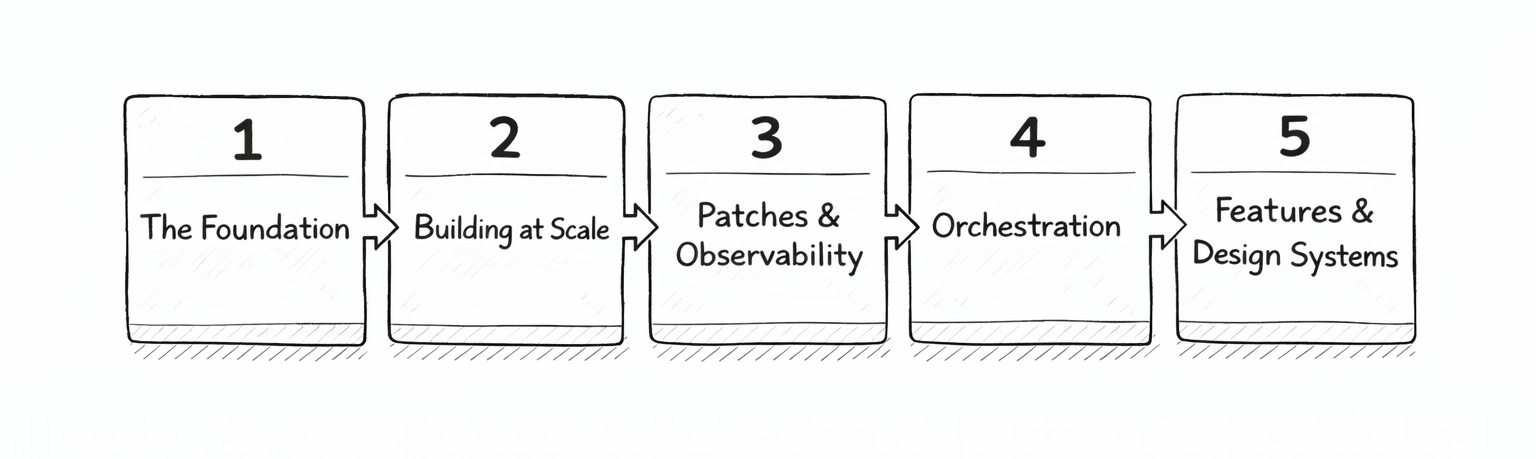
This article is the first in a series of five where I’ll break down every layer of that system:
The Foundation — Configuration as Code (this one)
CI/CD Part I — Bulding at Scale
CI/CD Part II — Patches & Observability
Orchestration — Automating the Boring Parts
Runtime Features & Design Systems
We start at the foundation: how one codebase becomes many apps through configuration.
Why Cross-Platform
Here’s the thing that trips people up: React Native projects have real android/ and ios/ folders. Actual native code. So in theory, you could set up iOS Targets in Xcode and Android Product Flavors in build.gradle the same way you would in a fully native project. And technically, you can. There are even repos demonstrating exactly this.
In practice, three things break down.
Autolinking fights you. React Native’s autolinking system — the thing that wires native modules into your project automatically — was designed for a single target. The legacy react-native link only linked to the first Xcode target and was closed as “wontfix.” The modern CocoaPods-based autolinking works across multiple targets if you call use_native_modules! inside each target block, but there’s no built-in way to exclude specific native modules from specific targets. When one flavor needs an SDK that another doesn’t, you’re patching tooling internals.
Metro has one resolver. Metro — the JavaScript bundler — has a single configuration per project. There’s no native concept of “this asset folder is for flavor A, that one is for flavor B” the way Android’s src/flavorName/res/ works. You have to build a custom resolution yourself.
Expo’s prebuild wipes manual configs. If you’re using Expo, npx expo prebuild --clean regenerates the android/ and ios/ directories from your app config. Any manually added Targets, Flavors, Podfile tweaks, or Xcode scheme modifications get deleted. The intended escape hatch is Config Plugins — writing TypeScript that generates native configuration — but now you’re maintaining an abstraction layer on top of the native build system.
And even setting Expo aside, native Targets and Flavors don’t scale. Managing 5 Xcode Targets is fine. Managing 50 is painful. Managing 400 is impossible. Each Target needs its own scheme, its own signing configuration, its own Info.plist. Every native dependency you add needs to be linked to every Target. The complexity grows multiplicatively.
That’s why teams building white-label RN apps — including me — end up building config-driven systems instead: a single Target, a single set of Flavors (or none at all), and an environment-injection layer that swaps identity at build time. That’s the approach this series covers.
A note on Flutter: If you’re in the Flutter world, the mental models in this article apply — arguably even more cleanly. Flutter has first-class flavor support baked into the CLI (flutter build apk --flavor clientA), built-in per-flavor asset bundling in pubspec.yaml, and compile-time config injection via --dart-define-from-file. The framework recognizes flavors as a concept at every level: CLI, build system, asset bundler, and runtime. React Native doesn’t have that unifying abstraction — which is exactly why you need to build it.
Classifying Customizations
Before writing any code, it helps to classify what actually changes per flavor. Not everything is the same kind of change, and understanding the categories shapes how you architect the system.
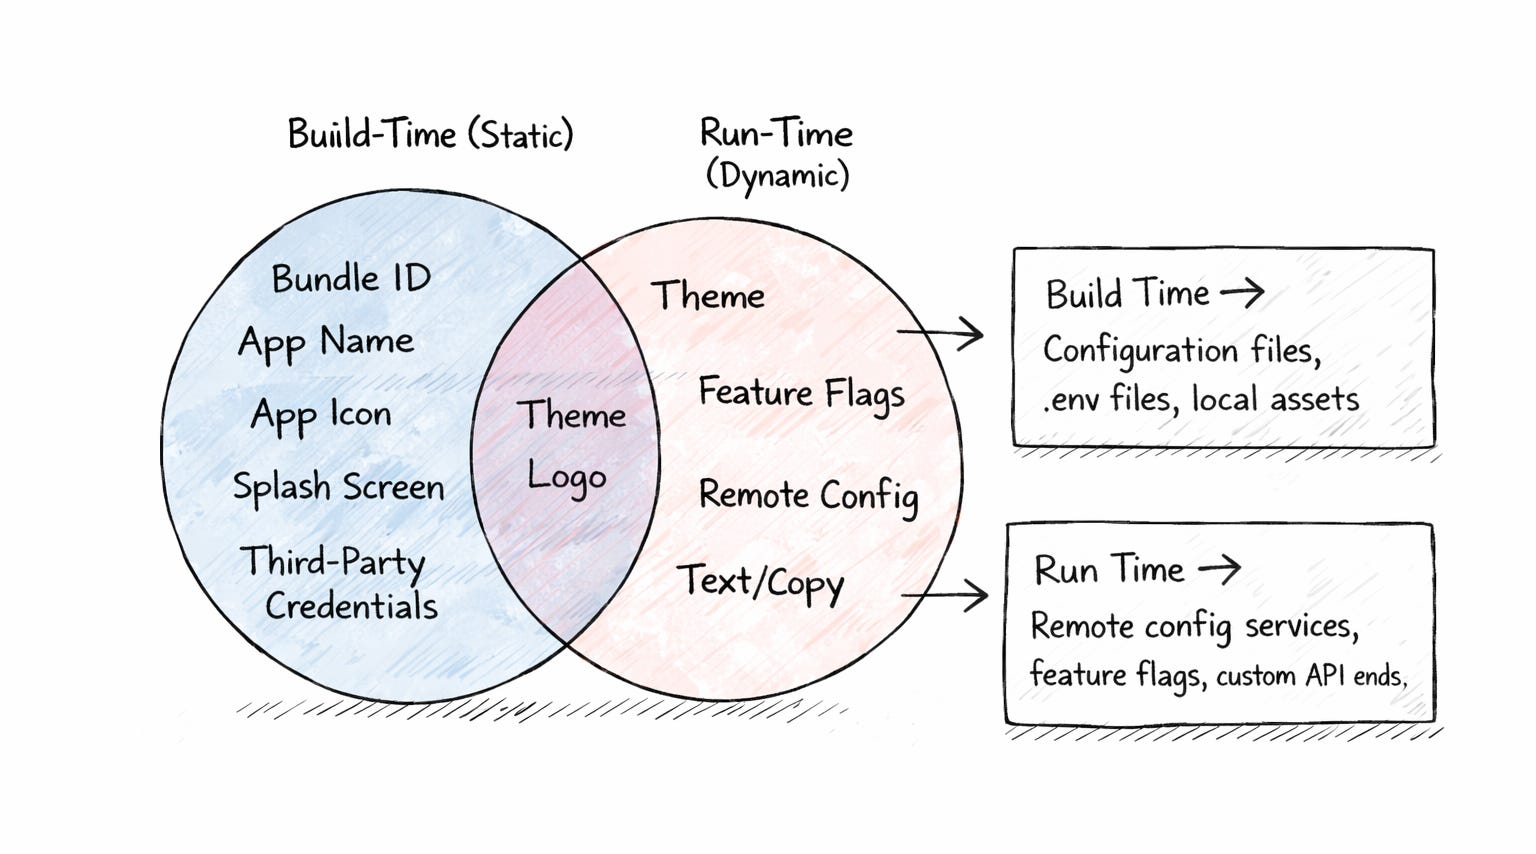
Mobile apps are compiled products distributed as binaries through stores. That constraint creates two categories:
Build-time (static) customizations are baked into the binary. You can’t change them after the app is compiled:
Bundle ID / package name
App display name
App icon and splash screen
Third-party service public keys (push notification IDs, analytics tokens, auth client IDs)
Environment files (
.env)Local assets (images, fonts)
Run-time (dynamic) customizations can change without a new build:
Feature flags
Remote config values
API-driven content and text
Remote asset URLs (S3 buckets, CDNs)
Here’s the key insight: anything that can be dynamic can also be static. You can always hardcode a value that you’d otherwise fetch remotely. But the reverse isn’t true — you can’t change a bundle ID or an app icon at runtime. The store won’t let you.
This leaves you with two strategies:
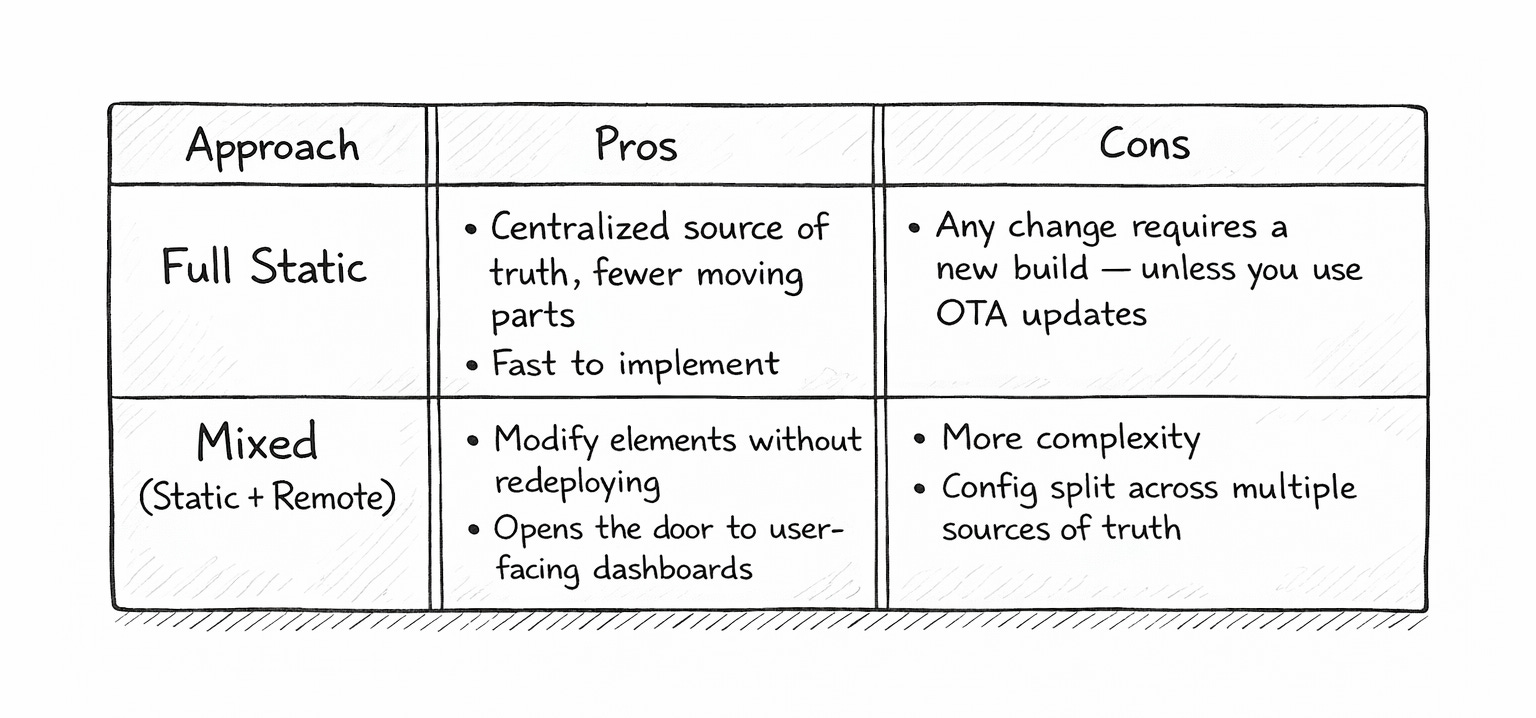
My advice: start fully static. Get the system working end-to-end with everything controlled at build time. You can always layer in remote config later once you understand what actually needs to change dynamically. Don’t over-engineer day one.
Expo as the Foundation
This is where the real architecture starts.
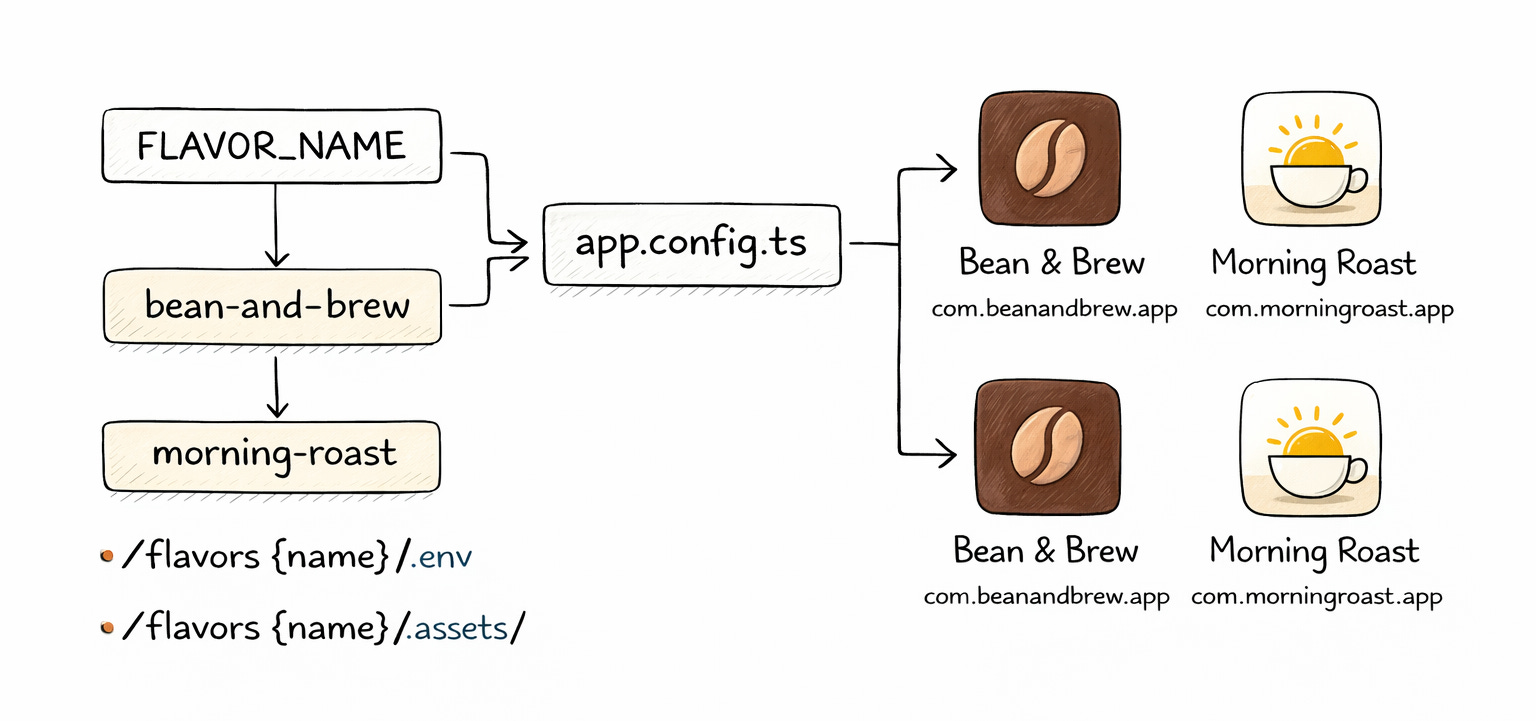
Expo supports two kinds of configuration: a static app.json and a dynamic app.config.ts (or .js). The static version is fine for a single app. But for white-labeling, you need the dynamic one — because the config needs to read from the environment and make decisions.
The entire flavor system hinges on one environment variable: FLAVOR_NAME. When you set FLAVOR_NAME=bean-and-brew, the config file loads that flavor’s configuration, points to that flavor’s assets, and wires up that flavor’s third-party keys. The output is a fully configured app — different bundle ID, different name, different icon, different everything.
Here’s a simplified version of what that looks like using .env files (but this can also be solved with a JSON file):
// app.config.ts
import dotenv from 'dotenv';
import path from 'path';
import { ExpoConfig, ConfigContext } from 'expo/config';

const FLAVOR_NAME = process.env.FLAVOR_NAME ?? 'main';

// Load the base environment
dotenv.config({ path: path.join(__dirname, '.env') });

// Override with flavor-specific environment
if (FLAVOR_NAME !== 'main') {
  dotenv.config({
    path: path.join(__dirname, `./flavors/${FLAVOR_NAME}/.env`),
    override: true,
  });
}

const { APP_ID, DISPLAY_NAME, SLUG } = process.env;

export default ({ config }: ConfigContext): ExpoConfig => ({
  ...config,
  name: DISPLAY_NAME,
  slug: SLUG,
  ios: {
    bundleIdentifier: APP_ID,
    icon: `./flavors/${FLAVOR_NAME}/assets/icons/ios-icon.png`,
  },
  android: {
    package: APP_ID,
    adaptiveIcon: {
      foregroundImage: `./flavors/${FLAVOR_NAME}/assets/icons/android-icon.png`,
      backgroundColor: '#FFFFFF',
    },
  },
  splash: {
    image: `./flavors/${FLAVOR_NAME}/assets/images/splash.png`,
  },
  plugins: [
    ['onesignal-expo-plugin', { mode: 'production' }],
    ['expo-build-properties', {
      android: { compileSdkVersion: 35 },
    }],
  ],
});
One file. One environment variable. Every flavor gets its own identity.
What Lives Inside a Flavor Folder
Each flavor gets a directory with everything that makes it unique:
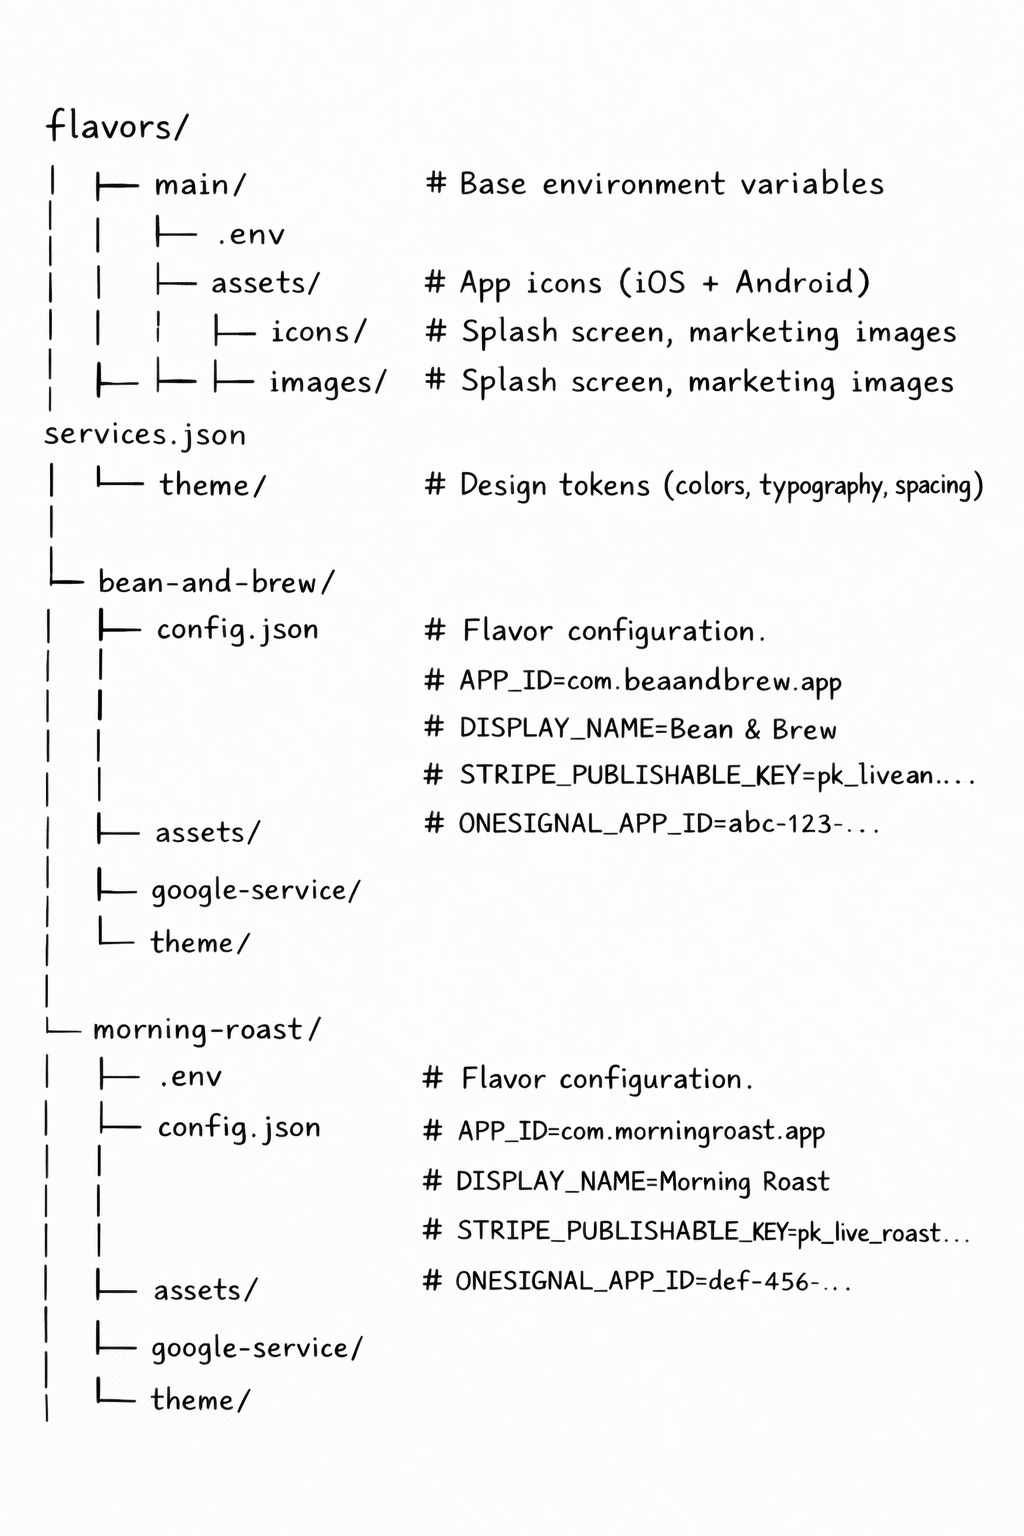
The config file is the contract. It defines the minimum a flavor needs to exist:
type FlavorConfig = {
  codeName: string;       // Folder name and internal identifier
  displayName: string;    // What the user sees on their home screen
  slug: string;           // URL-safe identifier, used for deep links
  bundleId: string;       // com.brand.appname — unique per store listing
  splashColor?: string;   // Background color for the native splash screen
};
Everything else — assets, public keys, theme tokens — lives alongside it in the folder. The config file knows where to look because the folder structure is the convention.
Source of Truth: Local vs. Remote
When you have 5 flavors, keeping everything in the repo is fine. Each flavor folder is checked in, and your team can see the full picture in one place.
When you have 400+, that doesn’t scale. You don’t want hundreds of configs or env files with production keys sitting in your repository. At that point, the source of truth moves remote — a secrets manager (like AWS Secrets Manager), a custom API, or whatever system already manages your client data.
The pattern stays the same regardless. You add a prepare step:
# Fetch flavor config from remote source, hydrate local folder
bun run prepare-app --flavor bean-and-brew
This step fetches the config, downloads the assets, generates the theme tokens, and writes everything into the local flavors/bean-and-brew/ directory. From that point on, the build process doesn’t care where the data came from — it just reads from the folder.
A dedicated prepare script is one way to do this. You could also bind it to a hook — a pre-build hook in your CI pipeline, an EAS build lifecycle hook, or even a git hook that runs when you switch branches. The mechanism doesn’t matter as much as the principle: one step hydrates the local environment before the build starts.
Local for development, remote for production. Same folder structure either way.
The Credential Problem
This is the part people underestimate. White-labeling isn’t just visual — each flavor often needs its own set of credentials for the third-party services your app depends on.
The reason is straightforward: many services use the bundle ID as an identifier. When you register an app with Google Sign-In, you register a specific bundle ID. When you configure push notifications, the certificate is tied to a specific bundle ID. New bundle ID, new registration.
Your app might use Stripe for payments. The code is identical across all flavors — same SDK, same checkout flow, same API calls. But each flavor connects to a different Stripe account with its own publishable key. The coffee chain downtown has their Stripe account; the roastery across town has theirs.
The same pattern applies across the board:
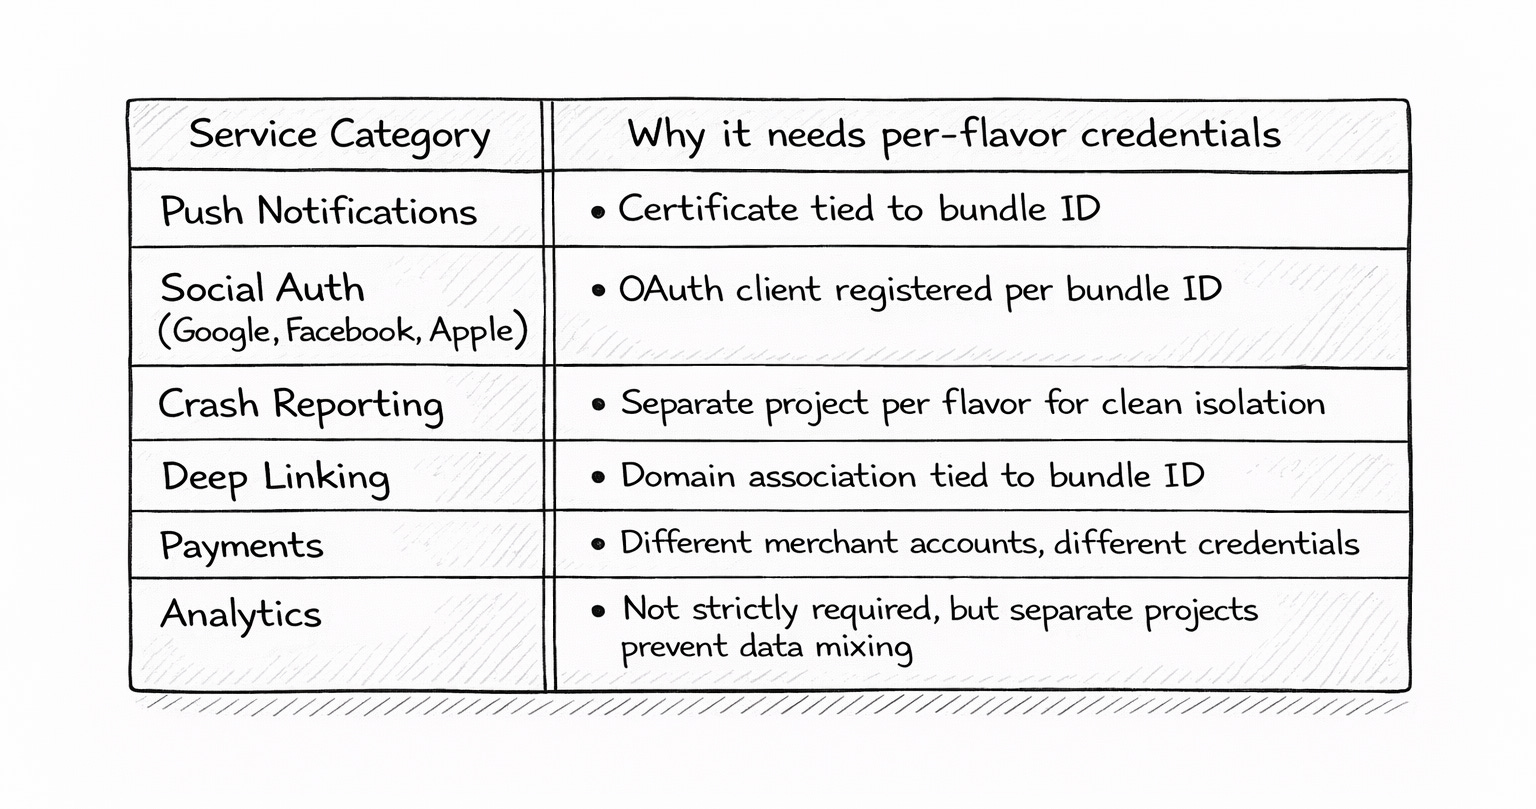
The implementation is simple: all of these keys live in the flavor’s config or .env file. The app code reads process.env.STRIPE_PUBLISHABLE_KEY and gets the right value for the current flavor. No if/else statements, no flavor-aware logic in the codebase. The code is flavor-agnostic; the environment is not.
# flavors/bean-and-brew/.env
APP_ID=com.beanandbrew.app
DISPLAY_NAME=Bean & Brew
STRIPE_PUBLISHABLE_KEY=pk_live_bean_abc123
ONESIGNAL_APP_ID=67a5d952-b831-4d42-bfcd-b53671516c9f
GOOGLE_WEB_CLIENT_ID=313037593899-beanandbrew.apps.googleusercontent.com
DATADOG_CLIENT_TOKEN=pub_bean_xyz789
# flavors/morning-roast/.env
APP_ID=com.morningroast.app
DISPLAY_NAME=Morning Roast
STRIPE_PUBLISHABLE_KEY=pk_live_roast_def456
ONESIGNAL_APP_ID=89b3e741-a923-4c21-9def-c12345678901
GOOGLE_WEB_CLIENT_ID=420158734012-morningroast.apps.googleusercontent.com
DATADOG_CLIENT_TOKEN=pub_roast_abc012Same app. Same code. Different identity.
One important caveat: in React Native, anything injected via process.env during the build gets baked into the JavaScript bundle. It’s not secret — it can be reverse-engineered from the compiled app. Only use public keys here: publishable keys, app IDs, client tokens. Actual secrets — Stripe secret keys, service account credentials, API signing keys — belong on your server, never in the bundle. If you use json files or generate on the fly .env files in your flavor folder is for clientside configration, not server-side secrets
Theming, Tokens, and Design Systems
Each flavor needs its own visual identity — colors, typography, spacing, border radius. The solution is design tokens: a structured set of variables that define the look and feel of each flavor without touching component code.
The pipeline works like this: Figma holds the design source of truth, with variables defined per brand. A script exports those variables and transforms them into TypeScript token files — primitives for colors, semantic tokens for light/dark themes, spacing scales, typography definitions. Each flavor’s theme/ folder contains its own generated set. The app’s design system components consume them at build time. Same button, same card, same layout — different skin.
With Figma Variables, this workflow has become significantly more streamlined. You define your token hierarchy once (primitives → semantic → component) and swap the primitive layer per brand. But this topic — the design system architecture, the token generation pipeline, and how Figma Variables fit in — deserves its own deep dive. That’s coming in Article 5.
Dynamic Asset Injection
Metro is the JavaScript bundler that React Native uses. When your code says import logo from ./assets/logo.png, Metro resolves that path to an actual file. That resolution step is where the flavor magic happens for assets.
The idea: create a custom resolver that intercepts specific import paths and redirects them to the current flavor’s folder. Your components always import from @flavors/assets/logo.png. Metro decides at build time which actual file it points to.
// metro.config.js
const flavor = process.env.FLAVOR_NAME || 'main';
const flavorFolder = path.join(__dirname, 'flavors', flavor);

config.resolver.resolveRequest = (context, moduleName, platform) => {
  if (moduleName.startsWith('@flavors/')) {
    const relativePath = moduleName.replace('@flavors/', '');
    const flavorPath = path.join(flavorFolder, relativePath);

    // Try flavor-specific file first
    if (fs.existsSync(flavorPath)) {
      return { filePath: flavorPath, type: 'sourceFile' };
    }

    // Fall back to main flavor
    const mainPath = path.join(__dirname, 'flavors', 'main', relativePath);
    return { filePath: mainPath, type: 'sourceFile' };
  }

  return context.resolveRequest(context, moduleName, platform);
};
The fallback is important. If bean-and-brew it doesn’t have a custom onboarding-bg.png, It falls back to main version. This keeps flavor folders lean — you only override what’s different. A flavor might only need a custom icon, splash, and theme. Everything else inherits from min.

From the developer’s perspective, this is invisible. You write your component once:
import logo from '@flavors/assets/images/logo.png';
import { theme } from '@flavors/theme';

const Header = () => (
  <View style={{ backgroundColor: theme.colors.primary }}>
    <Image source={logo} />
  </View>
);
This component works for every flavor. Metro handles the rest.
The Build Wrapper
At this point, you have a codebase that can become any flavor. Set FLAVOR_NAME, run the build, and out comes a fully branded app with its own identity, credentials, and visual language. That’s the foundation.
But how do you actually build and ship hundreds of these? Manually running eas build for each flavor isn’t going to work when you have 400 of them. You need automation.
The build tool — EAS Build in the Expo ecosystem — is powerful. It handles native compilation, code signing, and artifact distribution. But it was designed for building one app at a time. It wasn’t built for multi-tenant orchestration.
The first thing you build on top of it is a wrapper: a script that sits between your CI pipeline and the build tool. It handles everything the build tool doesn’t know about — flavors, secrets, credential validation, and dynamic config injection.
Here’s what the wrapper does, conceptually:
1. Receive flavor name
   └─ "bean-and-brew"

2. Fetch secrets and config
   └─ Pull from secrets manager or local folder

3. Validate credentials
   └─ Does the Apple P8 key exist? Is the push cert valid?

4. Inject into build config
   └─ Write FLAVOR_NAME, BUILD_NUMBER, credentials into eas.json

5. Call the build tool
   └─ eas build --platform ios --profile production --non-interactive

6. Report result
   └─ Notify CI: success or failure, with build URL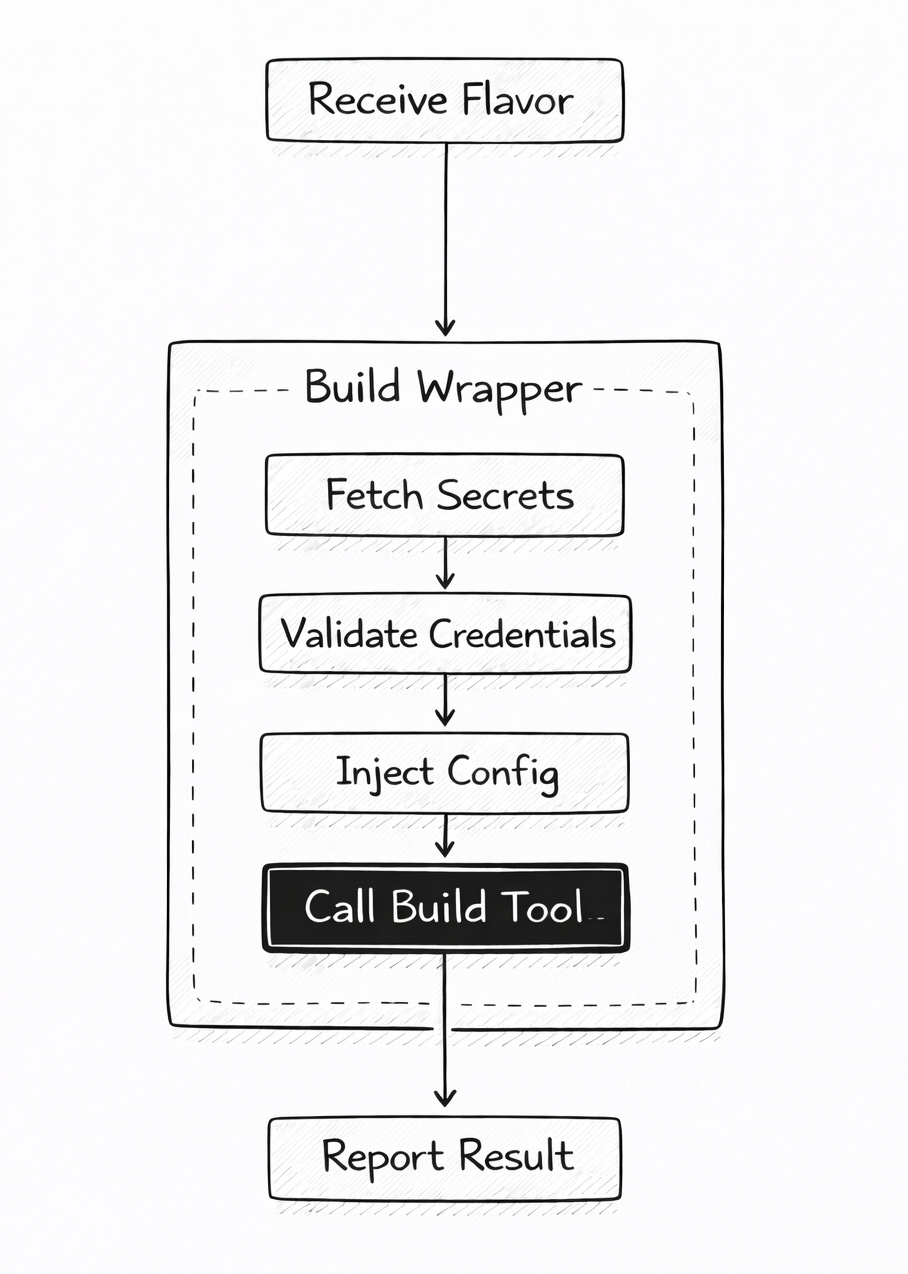
This wrapper becomes the foundation for everything in Articles 2, 3, and 4. Once you have a script that can build any single flavor reliably, the next step is calling it hundreds of times in parallel — and that’s where CI/CD gets interesting.
Configuration is the easy part. Orchestration is where it gets real.
Next in the series: Part 2 — Building at Scale, where we take this single-flavor build wrapper and turn it into a CI pipeline that builds hundreds of apps in parallel.